SSE 服务器
SSE(服务器发送事件)是一种服务器到客户端的流式传输标准,允许服务器通过 HTTP 向客户端推送实时更新。这对于需要实时更新的应用非常有用,比如聊天应用、通知或实时数据流。此外,您的服务器可以被多个客户端同时使用,因为它运行在服务器上,比如云端。
概述
本课将介绍如何构建和使用 SSE 服务器。
学习目标
完成本课后,您将能够:
- 构建 SSE 服务器。
- 使用 Inspector 调试 SSE 服务器。
- 使用 Visual Studio Code 连接并使用 SSE 服务器。
SSE 工作原理
SSE 是两种支持的传输类型之一。您之前的课程中已经见过第一种 stdio 的使用。它们的区别如下:
- SSE 需要您处理两件事:连接和消息。
- 由于服务器可以部署在任何地方,您需要在使用 Inspector 和 Visual Studio Code 等工具时反映这一点。也就是说,您不是指定如何启动服务器,而是指定服务器可建立连接的端点。请看下面的示例代码:
TypeScript
app.get("/sse", async (_: Request, res: Response) => {
    const transport = new SSEServerTransport('/messages', res);
    transports[transport.sessionId] = transport;
    res.on("close", () => {
        delete transports[transport.sessionId];
    });
    await server.connect(transport);
});

app.post("/messages", async (req: Request, res: Response) => {
    const sessionId = req.query.sessionId as string;
    const transport = transports[sessionId];
    if (transport) {
        await transport.handlePostMessage(req, res);
    } else {
        res.status(400).send('No transport found for sessionId');
    }
});
在上面的代码中:
/sse被设置为一个路由。当请求该路由时,会创建一个新的传输实例,服务器通过该传输进行连接。/messages是处理传入消息的路由。
Python
mcp = FastMCP("My App")

@mcp.tool()
def add(a: int, b: int) -> int:
    """Add two numbers"""
    return a + b

# Mount the SSE server to the existing ASGI server
app = Starlette(
    routes=[
        Mount('/', app=mcp.sse_app()),
    ]
)
在上面的代码中,我们:
- 创建了一个 ASGI 服务器实例(这里使用的是 Starlette),并挂载了默认路由
/
在后台,路由/sse和/messages分别被设置用来处理连接和消息。应用的其他部分,比如添加工具等功能,与 stdio 服务器类似。
.NET
    var builder = WebApplication.CreateBuilder(args);
    builder.Services
        .AddMcpServer()
        .WithTools<Tools>();


    builder.Services.AddHttpClient();

    var app = builder.Build();

    app.MapMcp();
    ```

    有两个方法帮助我们将普通的 Web 服务器转换为支持 SSE 的服务器:

    - `AddMcpServer`,该方法添加相关功能。
    - `MapMcp`,该方法添加类似 `/SSE` 和 `/messages` 的路由。
Now that we know a little bit more about SSE, let's build an SSE server next.
Exercise: Creating an SSE Server
To create our server, we need to keep two things in mind:
- We need to use a web server to expose endpoints for connection and messages.
- Build our server like we normally do with tools, resources and prompts when we were using stdio.
-1- Create a server instance
To create our server, we use the same types as with stdio. However, for the transport, we need to choose SSE.
TypeScript
import { Request, Response } from "express";
import express from "express";
import { McpServer } from "@modelcontextprotocol/sdk/server/mcp.js";
import { SSEServerTransport } from "@modelcontextprotocol/sdk/server/sse.js";

const server = new McpServer({
  name: "example-server",
  version: "1.0.0"
});

const app = express();

const transports: {[sessionId: string]: SSEServerTransport} = {};
In the preceding code we've:
- Created a server instance.
- Defined an app using the web framework express.
- Created a transports variable that we will use to store incoming connections.
Python
from starlette.applications import Starlette
from starlette.routing import Mount, Host
from mcp.server.fastmcp import FastMCP


mcp = FastMCP("My App")
In the preceding code we've:
- Imported the libraries we're going to need with Starlette (an ASGI framework) being pulled in.
- Created an MCP server instance
mcp.
.NET
var builder = WebApplication.CreateBuilder(args);
builder.Services
    .AddMcpServer();


builder.Services.AddHttpClient();

var app = builder.Build();

// TODO: add routes
At this point, we've:
- Created a web app
- Added support for MCP features through
AddMcpServer.
Let's add the needed routes next.
-2- Add routes
Let's add routes next that handle the connection and incoming messages:
TypeScript
app.get("/sse", async (_: Request, res: Response) => {
  const transport = new SSEServerTransport('/messages', res);
  transports[transport.sessionId] = transport;
  res.on("close", () => {
    delete transports[transport.sessionId];
  });
  await server.connect(transport);
});

app.post("/messages", async (req: Request, res: Response) => {
  const sessionId = req.query.sessionId as string;
  const transport = transports[sessionId];
  if (transport) {
    await transport.handlePostMessage(req, res);
  } else {
    res.status(400).send('No transport found for sessionId');
  }
});

app.listen(3001);
In the preceding code we've defined:
- An
/sseroute that instantiates a transport of type SSE and ends up callingconnecton the MCP server. - A
/messagesroute that takes care of incoming messages.
Python
app = Starlette(
    routes=[
        Mount('/', app=mcp.sse_app()),
    ]
)
In the preceding code we've:
- Created an ASGI app instance using the Starlette framework. As part of that we passes
mcp.sse_app()to it's list of routes. That ends up mounting an/sseand/messagesroute on the app instance.
.NET
var builder = WebApplication.CreateBuilder(args);
builder.Services
    .AddMcpServer();

builder.Services.AddHttpClient();

var app = builder.Build();

app.MapMcp();
We've added one line of code at the end add.MapMcp() this means we now have routes /SSE and /messages.
Let's add capabilties to the server next.
-3- Adding server capabilities
Now that we've got everything SSE specific defined, let's add server capabilities like tools, prompts and resources.
TypeScript
server.tool("random-joke", "A joke returned by the chuck norris api", {},
  async () => {
    const response = await fetch("https://api.chucknorris.io/jokes/random");
    const data = await response.json();

    return {
      content: [
        {
          type: "text",
          text: data.value
        }
      ]
    };
  }
);
Here's how you can add a tool for example. This specific tool creates a tool call "random-joke" that calls a Chuck Norris API and returns a JSON response.
Python
@mcp.tool()
def add(a: int, b: int) -> int:
    """Add two numbers"""
    return a + b
Now your server has one tool.
TypeScript
// server-sse.ts
import { Request, Response } from "express";
import express from "express";
import { McpServer } from "@modelcontextprotocol/sdk/server/mcp.js";
import { SSEServerTransport } from "@modelcontextprotocol/sdk/server/sse.js";

// 创建 MCP 服务器
const server = new McpServer({
  name: "example-server",
  version: "1.0.0",
});

const app = express();

const transports: { [sessionId: string]: SSEServerTransport } = {};

app.get("/sse", async (_: Request, res: Response) => {
  const transport = new SSEServerTransport("/messages", res);
  transports[transport.sessionId] = transport;
  res.on("close", () => {
    delete transports[transport.sessionId];
  });
  await server.connect(transport);
});

app.post("/messages", async (req: Request, res: Response) => {
  const sessionId = req.query.sessionId as string;
  const transport = transports[sessionId];
  if (transport) {
    await transport.handlePostMessage(req, res);
  } else {
    res.status(400).send("No transport found for sessionId");
  }
});

server.tool("random-joke", "一个由 chuck norris API 返回的笑话", {}, async () => {
  const response = await fetch("https://api.chucknorris.io/jokes/random");
  const data = await response.json();

  return {
    content: [
      {
        type: "text",
        text: data.value,
      },
    ],
  };
});

app.listen(3001);
Python
from starlette.applications import Starlette
from starlette.routing import Mount, Host
from mcp.server.fastmcp import FastMCP


mcp = FastMCP("My App")

@mcp.tool()
def add(a: int, b: int) -> int:
    """两个数字相加"""
    return a + b

# 将 SSE 服务器挂载到现有的 ASGI 服务器上
app = Starlette(
    routes=[
        Mount('/', app=mcp.sse_app()),
    ]
)
.NET
- Let's create some tools first, for this we will create a file Tools.cs with the following content:
using System.ComponentModel;
using System.Text.Json;
using ModelContextProtocol.Server;

namespace server;

[McpServerToolType]
public sealed class Tools
{

    public Tools()
    {

    }

    [McpServerTool, Description("将两个数字相加。")]
    public async Task<string> AddNumbers(
        [Description("第一个数字")] int a,
        [Description("第二个数字")] int b)
    {
        return (a + b).ToString();
    }

}
Here we've added the following:
- Created a class
Toolswith the decoratorMcpServerToolType. - Defined a tool
AddNumbersby decorating the method withMcpServerTool. We've also provided parameters and an implementation.
- Let's leverage the
Toolsclass we just created:
var builder = WebApplication.CreateBuilder(args);
builder.Services
    .AddMcpServer()
    .WithTools<Tools>();


builder.Services.AddHttpClient();

var app = builder.Build();

app.MapMcp();
We've added a call to WithTools that specifies Tools as the class containing the tools. That's it, we're ready.
Great, we have a server using SSE, let's take it for a spin next.
Exercise: Debugging an SSE Server with Inspector
Inspector is a great tool that we saw in a previous lesson Creating your first server. Let's see if we can use the Inspector even here:
-1- Running the inspector
To run the inspector, you first must have an SSE server running, so let's do that next:
- Run the server
TypeScript
tsx && node ./build/server-sse.tsPython
uvicorn server:app
Note how we use the executableuvicornthat's installed when we typedpip install "mcp[cli]". Typingserver:appmeans we're trying to run a fileserver.pyand for it to have a Starlette instance calledapp..NET
dotnet run
This should start the server. To interface with it you need a new terminal. - Run the inspector
![NOTE] Run this in a separate terminal window than the server is running in. Also note, you need to adjust the below command to fit the URL where your server runs.
npx @modelcontextprotocol/inspector --cli http://localhost:8000/sse --method tools/list
运行 Inspector 在所有运行时环境中看起来都一样。注意这里我们不是传入服务器的路径和启动命令,而是传入服务器运行的 URL,并且指定了/sse路由。
-2- 试用工具
通过下拉列表选择 SSE 连接服务器,并填写服务器运行的 URL,比如 http:localhost:4321/sse。然后点击“连接”按钮。和之前一样,选择列出工具,选择一个工具并输入参数。你应该会看到如下结果:
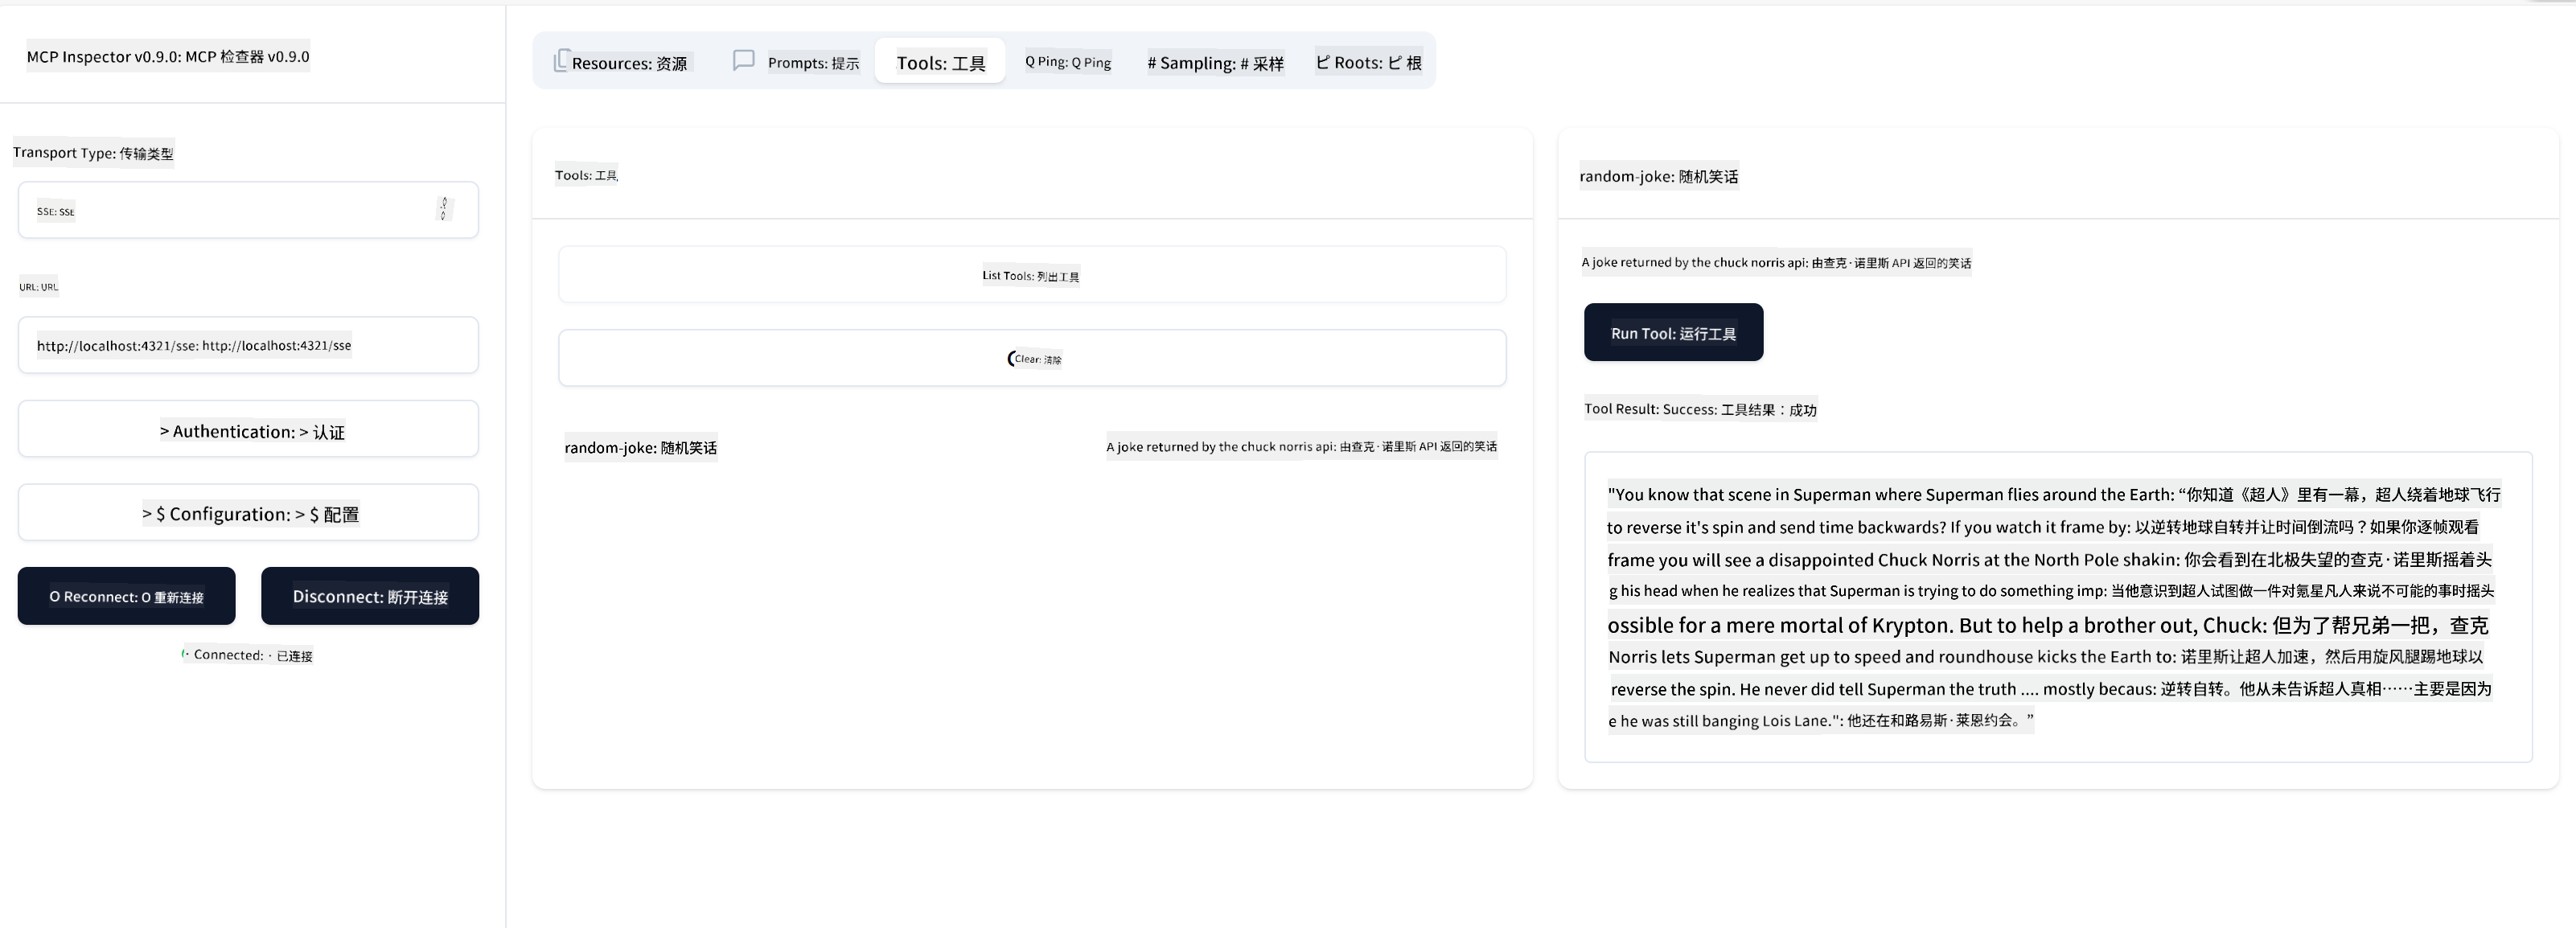
很好,你已经可以使用 Inspector 了,接下来我们看看如何用 Visual Studio Code 来操作。
练习
尝试为你的服务器添加更多功能。参考这个页面,例如添加一个调用 API 的工具。服务器的样子由你决定。祝你玩得开心 :)
解决方案
解决方案 这里有一个可用的示例代码。
关键要点
本章的关键要点如下:
- SSE 是继 stdio 之后支持的第二种传输方式。
- 支持 SSE 需要使用 Web 框架管理传入的连接和消息。
- 你可以像使用 stdio 服务器一样,使用 Inspector 和 Visual Studio Code 来连接 SSE 服务器。注意 stdio 和 SSE 之间有些差异。对于 SSE,你需要单独启动服务器,然后运行 Inspector 工具。Inspector 工具还需要指定 URL。
示例
额外资源
接下来
免责声明:
本文件使用 AI 翻译服务 Co-op Translator 进行翻译。虽然我们力求准确,但请注意,自动翻译可能包含错误或不准确之处。原始文件的母语版本应被视为权威来源。对于重要信息,建议使用专业人工翻译。对于因使用本翻译而产生的任何误解或误释,我们不承担任何责任。