🔧 模块 3:使用 AI 工具包进行高级 MCP 开发
🎯 学习目标
完成本实验后,您将能够:
- ✅ 使用 AI 工具包创建自定义 MCP 服务器
- ✅ 配置并使用最新的 MCP Python SDK(v1.9.3)
- ✅ 设置并使用 MCP Inspector 进行调试
- ✅ 在 Agent Builder 和 Inspector 环境中调试 MCP 服务器
- ✅ 理解高级 MCP 服务器开发流程
📋 先决条件
- 完成实验 2(MCP 基础)
- 安装了 AI 工具包扩展的 VS Code
- Python 3.10+ 环境
- 用于 Inspector 设置的 Node.js 和 npm
🏗️ 您将构建的内容
在本实验中,您将创建一个 天气 MCP 服务器,演示:
- 自定义 MCP 服务器实现
- 与 AI 工具包 Agent Builder 集成
- 专业的调试流程
- 现代 MCP SDK 使用模式
🔧 核心组件概览
🐍 MCP Python SDK
Model Context Protocol Python SDK 是构建自定义 MCP 服务器的基础。您将使用带有增强调试功能的 1.9.3 版本。
🔍 MCP Inspector
一款强大的调试工具,提供:
- 实时服务器监控
- 工具执行可视化
- 网络请求/响应检查
- 交互式测试环境
📖 逐步实现
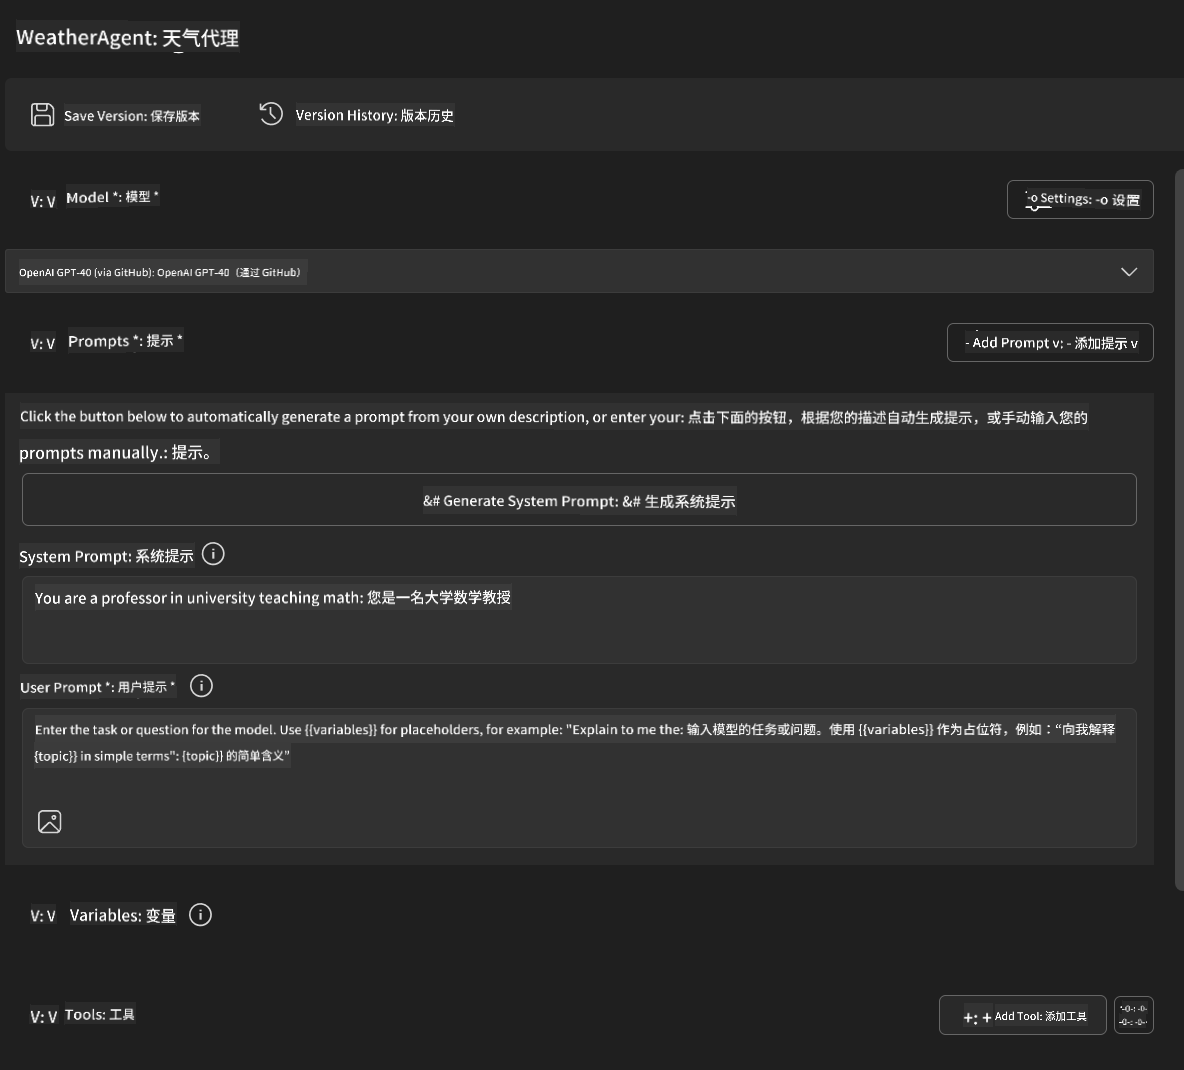
第 1 步:在 Agent Builder 中创建 WeatherAgent
- 通过 AI 工具包扩展在 VS Code 中启动 Agent Builder
- 创建一个新代理,配置如下:
- 代理名称:
WeatherAgent
- 代理名称:
第 2 步:初始化 MCP 服务器项目
- 在 Agent Builder 中导航到工具 → 添加工具
- 从可选项中选择 “MCP Server”
- 选择 “创建一个新的 MCP 服务器”
- 选择
python-weather模板 - 为服务器命名:
weather_mcp

第 3 步:打开并检查项目
- 在 VS Code 中打开生成的项目
- 查看项目结构:
weather_mcp/
├── src/
│   ├── __init__.py
│   └── server.py
├── inspector/
│   ├── package.json
│   └── package-lock.json
├── .vscode/
│   ├── launch.json
│   └── tasks.json
├── pyproject.toml
└── README.md
第 4 步:升级到最新 MCP SDK
🔍 为什么要升级? 我们希望使用最新的 MCP SDK(v1.9.3)和 Inspector 服务(0.14.0),以获得更强大的功能和更好的调试体验。
4a. 更新 Python 依赖
编辑 pyproject.toml: 更新 ./code/weather_mcp/pyproject.toml
4b. 更新 Inspector 配置
编辑 inspector/package.json: 更新 ./code/weather_mcp/inspector/package.json
4c. 更新 Inspector 依赖
编辑 inspector/package-lock.json: 更新 ./code/weather_mcp/inspector/package-lock.json
📝 注意: 该文件包含大量依赖定义。以下是关键结构——完整内容确保依赖正确解析。
⚡ 完整的 Package Lock: 完整的 package-lock.json 文件包含约 3000 行依赖定义。上面展示的是关键结构——请使用提供的文件以确保完整依赖解析。
第 5 步:配置 VS Code 调试
注意:请复制指定路径下的文件以替换对应的本地文件
5a. 更新启动配置
编辑 .vscode/launch.json:
{
  "version": "0.2.0",
  "configurations": [
    {
      "name": "Attach to Local MCP",
      "type": "debugpy",
      "request": "attach",
      "connect": {
        "host": "localhost",
        "port": 5678
      },
      "presentation": {
        "hidden": true
      },
      "internalConsoleOptions": "neverOpen",
      "postDebugTask": "Terminate All Tasks"
    },
    {
      "name": "Launch Inspector (Edge)",
      "type": "msedge",
      "request": "launch",
      "url": "http://localhost:6274?timeout=60000&serverUrl=http://localhost:3001/sse#tools",
      "cascadeTerminateToConfigurations": [
        "Attach to Local MCP"
      ],
      "presentation": {
        "hidden": true
      },
      "internalConsoleOptions": "neverOpen"
    },
    {
      "name": "Launch Inspector (Chrome)",
      "type": "chrome",
      "request": "launch",
      "url": "http://localhost:6274?timeout=60000&serverUrl=http://localhost:3001/sse#tools",
      "cascadeTerminateToConfigurations": [
        "Attach to Local MCP"
      ],
      "presentation": {
        "hidden": true
      },
      "internalConsoleOptions": "neverOpen"
    }
  ],
  "compounds": [
    {
      "name": "Debug in Agent Builder",
      "configurations": [
        "Attach to Local MCP"
      ],
      "preLaunchTask": "Open Agent Builder",
    },
    {
      "name": "Debug in Inspector (Edge)",
      "configurations": [
        "Launch Inspector (Edge)",
        "Attach to Local MCP"
      ],
      "preLaunchTask": "Start MCP Inspector",
      "stopAll": true
    },
    {
      "name": "Debug in Inspector (Chrome)",
      "configurations": [
        "Launch Inspector (Chrome)",
        "Attach to Local MCP"
      ],
      "preLaunchTask": "Start MCP Inspector",
      "stopAll": true
    }
  ]
}
编辑 .vscode/tasks.json:
{
  "version": "2.0.0",
  "tasks": [
    {
      "label": "Start MCP Server",
      "type": "shell",
      "command": "python -m debugpy --listen 127.0.0.1:5678 src/__init__.py sse",
      "isBackground": true,
      "options": {
        "cwd": "${workspaceFolder}",
        "env": {
          "PORT": "3001"
        }
      },
      "problemMatcher": {
        "pattern": [
          {
            "regexp": "^.*$",
            "file": 0,
            "location": 1,
            "message": 2
          }
        ],
        "background": {
          "activeOnStart": true,
          "beginsPattern": ".*",
          "endsPattern": "Application startup complete|running"
        }
      }
    },
    {
      "label": "Start MCP Inspector",
      "type": "shell",
      "command": "npm run dev:inspector",
      "isBackground": true,
      "options": {
        "cwd": "${workspaceFolder}/inspector",
        "env": {
          "CLIENT_PORT": "6274",
          "SERVER_PORT": "6277",
        }
      },
      "problemMatcher": {
        "pattern": [
          {
            "regexp": "^.*$",
            "file": 0,
            "location": 1,
            "message": 2
          }
        ],
        "background": {
          "activeOnStart": true,
          "beginsPattern": "Starting MCP inspector",
          "endsPattern": "Proxy server listening on port"
        }
      },
      "dependsOn": [
        "Start MCP Server"
      ]
    },
    {
      "label": "Open Agent Builder",
      "type": "shell",
      "command": "echo ${input:openAgentBuilder}",
      "presentation": {
        "reveal": "never"
      },
      "dependsOn": [
        "Start MCP Server"
      ],
    },
    {
      "label": "Terminate All Tasks",
      "command": "echo ${input:terminate}",
      "type": "shell",
      "problemMatcher": []
    }
  ],
  "inputs": [
    {
      "id": "openAgentBuilder",
      "type": "command",
      "command": "ai-mlstudio.agentBuilder",
      "args": {
        "initialMCPs": [ "local-server-weather_mcp" ],
        "triggeredFrom": "vsc-tasks"
      }
    },
    {
      "id": "terminate",
      "type": "command",
      "command": "workbench.action.tasks.terminate",
      "args": "terminateAll"
    }
  ]
}
🚀 运行和测试您的 MCP 服务器
第 6 步:安装依赖
完成配置更改后,运行以下命令:
安装 Python 依赖:
uv sync
安装 Inspector 依赖:
cd inspector
npm install
第 7 步:使用 Agent Builder 调试
- 按 F5 或使用 “在 Agent Builder 中调试” 配置
- 从调试面板选择复合配置
- 等待服务器启动并打开 Agent Builder
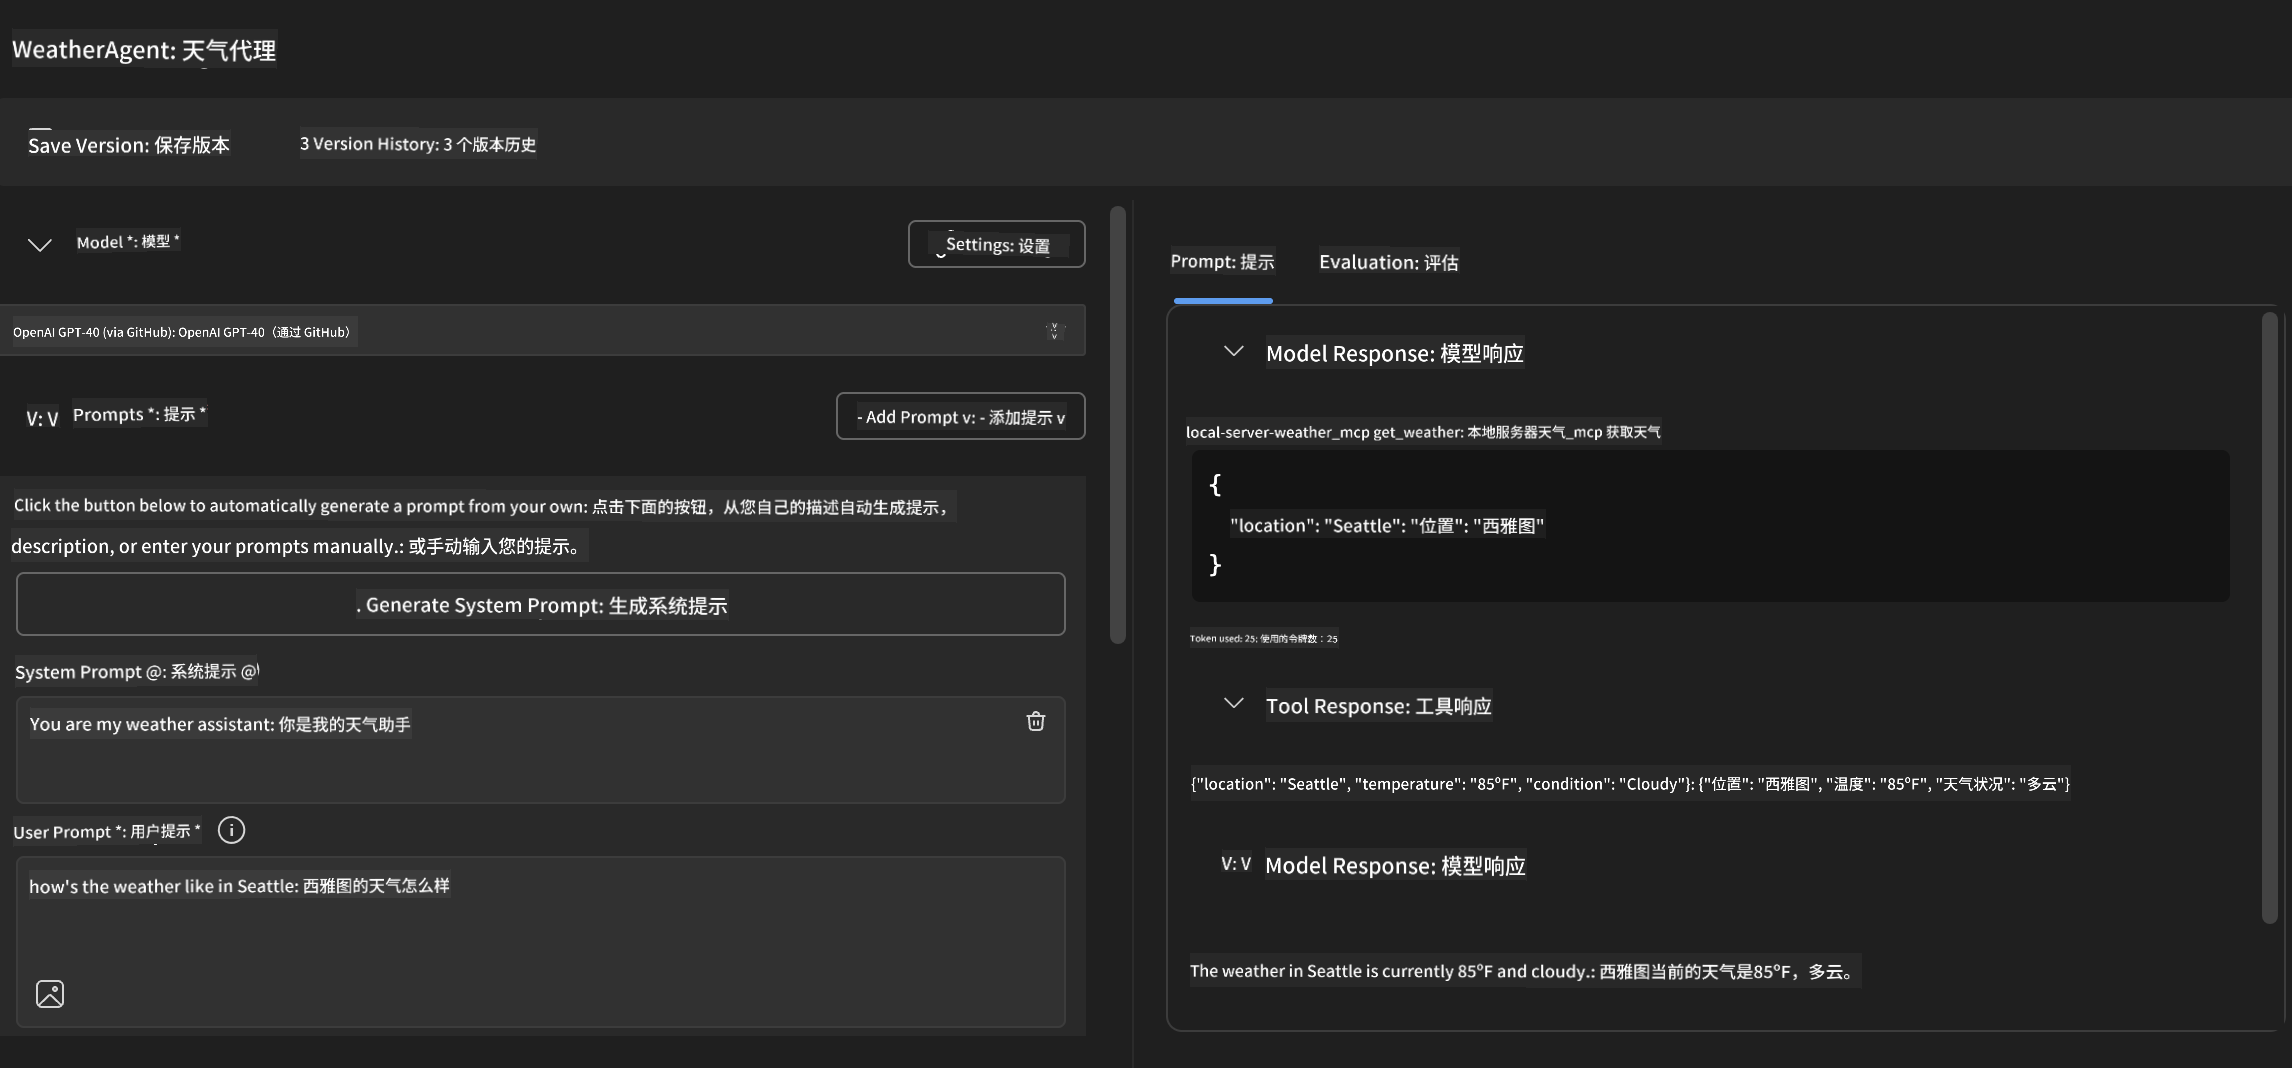
- 使用自然语言查询测试您的天气 MCP 服务器
输入提示如下
SYSTEM_PROMPT
You are my weather assistant
USER_PROMPT
How's the weather like in Seattle
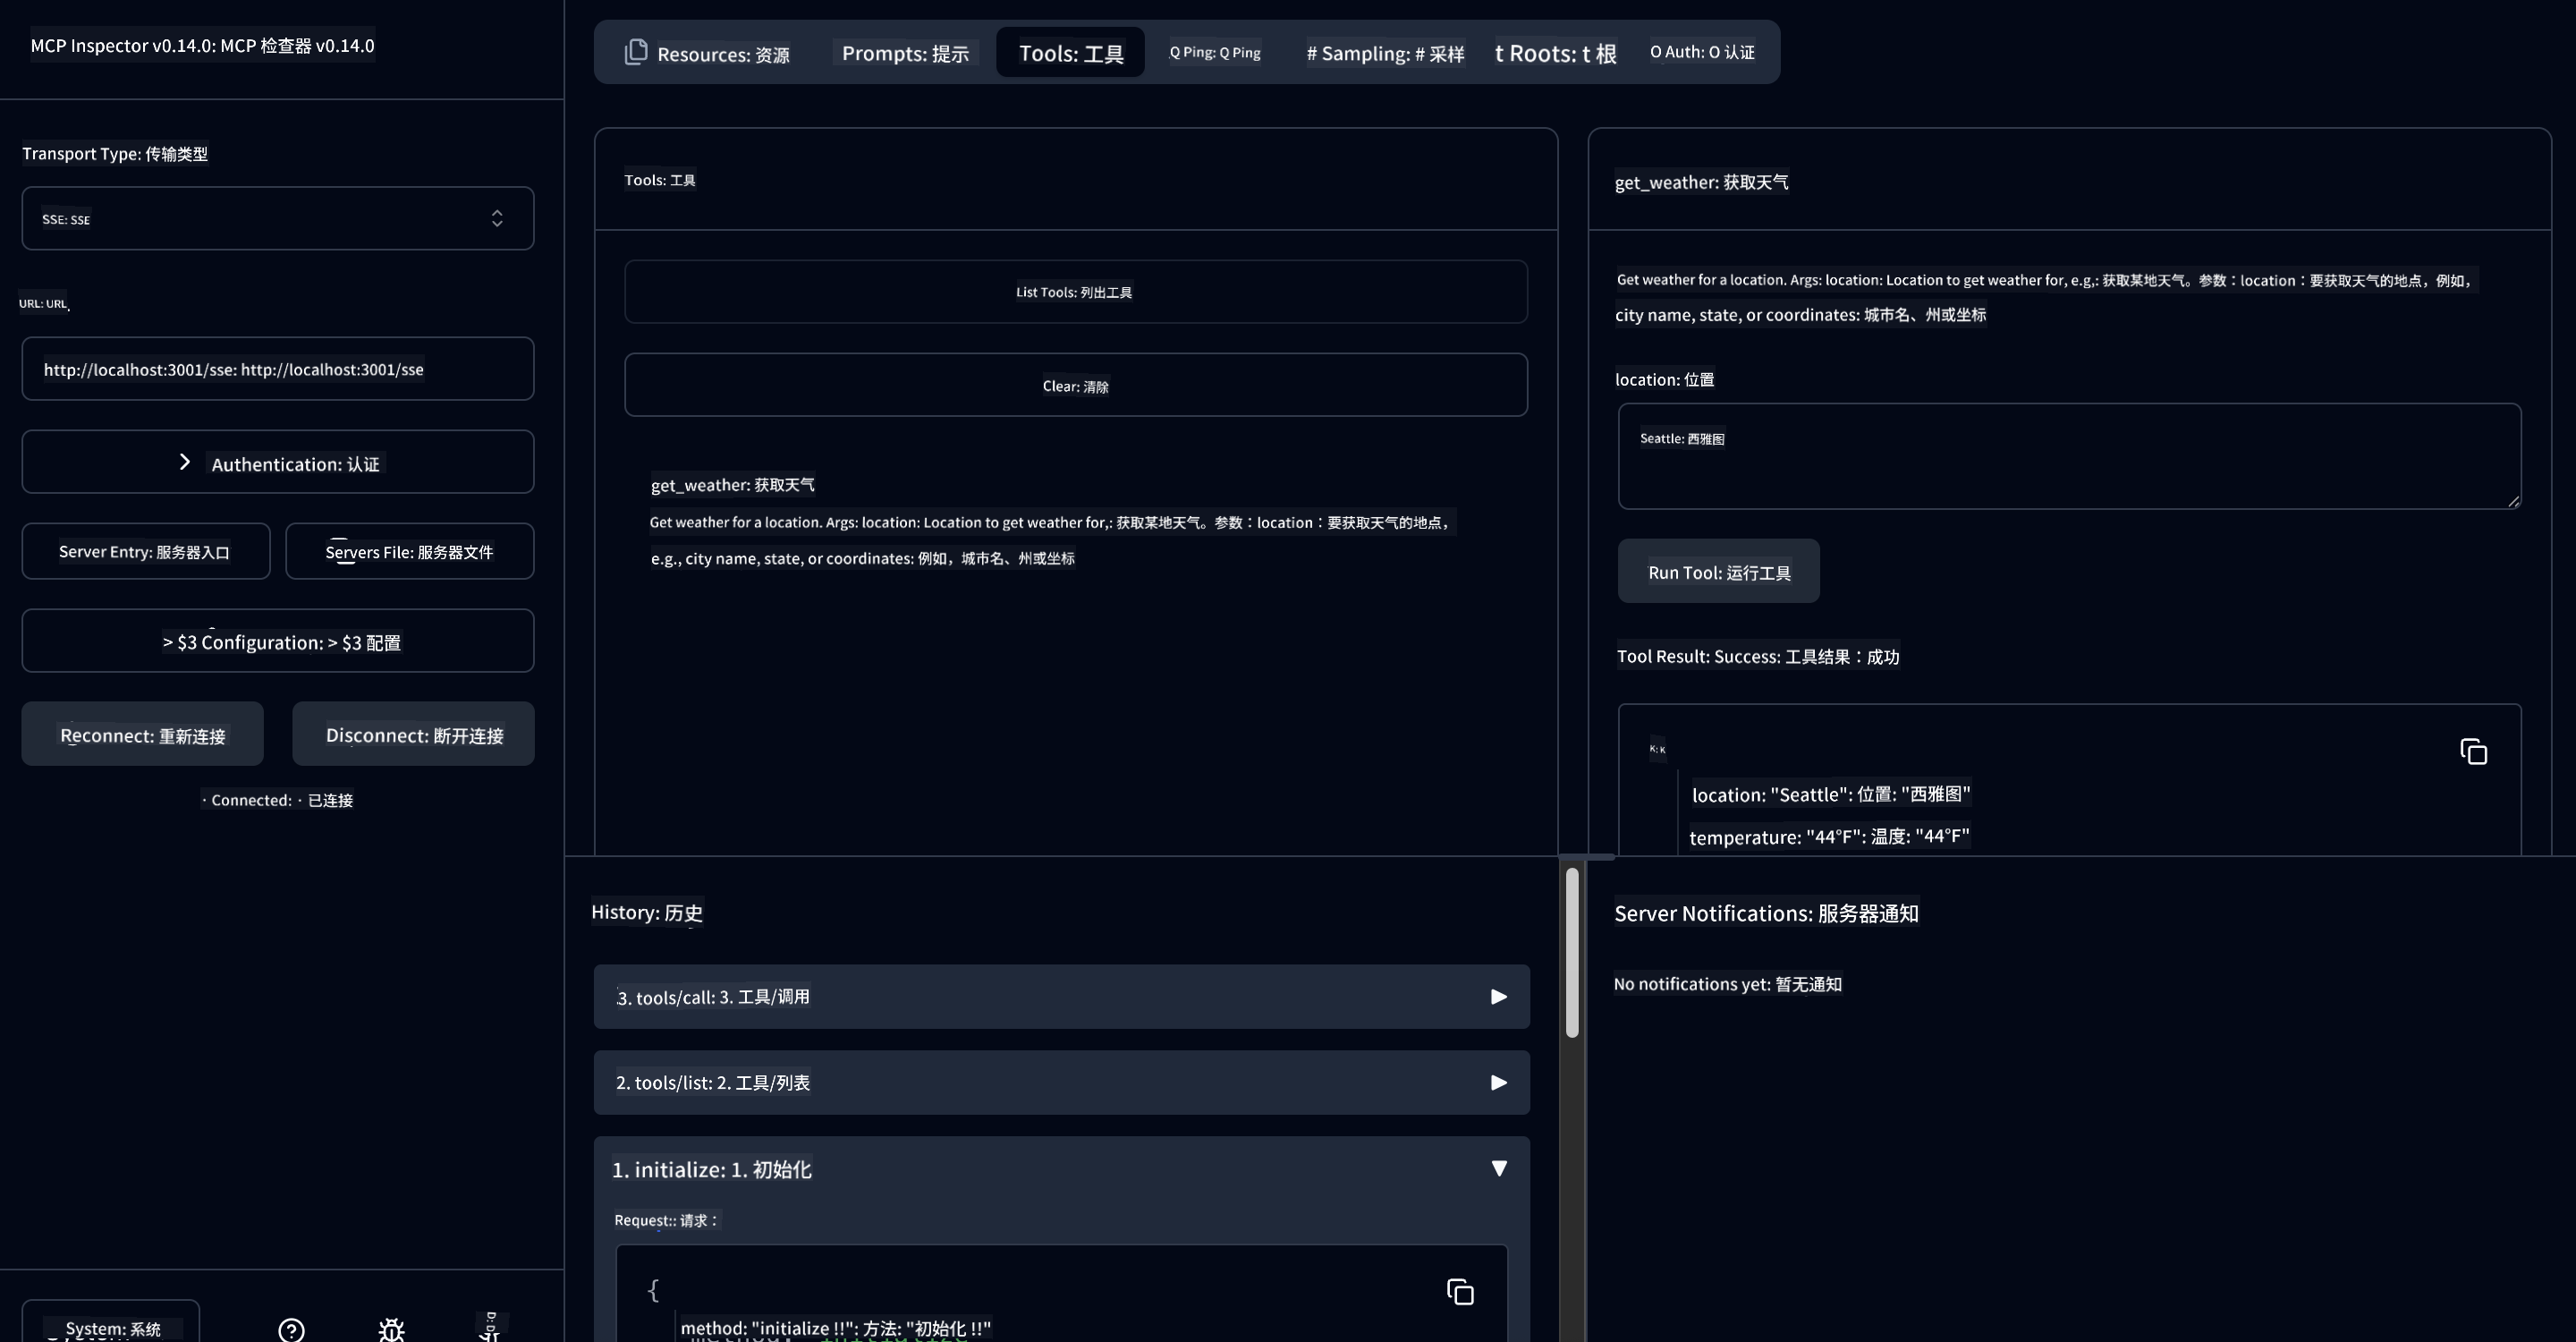
第 8 步:使用 MCP Inspector 调试
- 使用 “在 Inspector 中调试” 配置(Edge 或 Chrome)
- 打开 Inspector 界面,地址为
http://localhost:6274 - 探索交互式测试环境:
- 查看可用工具
- 测试工具执行
- 监控网络请求
- 调试服务器响应
🎯 关键学习成果
完成本实验后,您已经:
- 使用 AI 工具包模板创建了自定义 MCP 服务器
- 升级到最新 MCP SDK(v1.9.3),实现更强功能
- 配置了 Agent Builder 和 Inspector 的专业调试流程
- 设置了 MCP Inspector 进行交互式服务器测试
- 掌握了 MCP 开发的 VS Code 调试配置
🔧 探索的高级功能
| 功能 | 描述 | 使用场景 |
|---|---|---|
| MCP Python SDK v1.9.3 | 最新协议实现 | 现代服务器开发 |
| MCP Inspector 0.14.0 | 交互式调试工具 | 实时服务器测试 |
| VS Code 调试 | 集成开发环境 | 专业调试流程 |
| Agent Builder 集成 | 直接连接 AI 工具包 | 端到端代理测试 |
📚 额外资源
🎉 恭喜! 您已成功完成实验 3,现在可以使用专业开发流程创建、调试和部署自定义 MCP 服务器。
🔜 继续下一个模块
准备将您的 MCP 技能应用于真实开发流程?继续学习 模块 4:实用 MCP 开发 - 自定义 GitHub 克隆服务器,您将:
- 构建一个生产级 MCP 服务器,实现 GitHub 仓库操作自动化
- 通过 MCP 实现 GitHub 仓库克隆功能
- 将自定义 MCP 服务器与 VS Code 和 GitHub Copilot Agent 模式集成
- 在生产环境中测试和部署自定义 MCP 服务器
- 学习面向开发者的实用工作流自动化
免责声明:
本文件使用 AI 翻译服务 Co-op Translator 进行翻译。虽然我们力求准确,但请注意,自动翻译可能包含错误或不准确之处。原始文件的母语版本应被视为权威来源。对于重要信息,建议使用专业人工翻译。对于因使用本翻译而产生的任何误解或误释,我们概不负责。